WordPress Software Development at H1. Part 2: Application Structure

Application loader

Bedrock does give you a project structure, but for your own code, it is still just regular old plugins, mu plugins and themes. We like to place our project core code as an mu plugin, and we put inside a [appname]-application folder. If we come up with reusable functionality, we separate those as plugins and mu plugins.

We start our application up in a php file in mu-plugins directory. That file is called [appname]-loader.php and looks something like this:

namespace MyApplication;

use Symfony\Component\DependencyInjection\ContainerBuilder;
use Symfony\Component\Config\FileLocator;
use Symfony\Component\DependencyInjection\Loader\YamlFileLoader;

// Initiate Composer Autoloading.
require( ABSPATH . '../../vendor/autoload.php' );

// Bootstrap other mu plugins.
require( 'posts-to-posts/posts-to-posts.php' );
require( 'cmb/Custom-Meta-Boxes/custom-meta-boxes.php' );

// Load application configuration.
$container = new ContainerBuilder();
$loader = new YamlFileLoader( $container,
	new FileLocator( __DIR__ . '/../../../config' ) );
$loader->load( 'services.yml' );

// Initiate the application.
$container->get('application');

What is happening there? To my taste, there is too much boilerplate code in there that would benefit of being encapsulated somewhere else. But, basically we just initiate the Symfony DependencyInjection container with a configuration file and then get an instance of our application class from it. Because of what we had defined in the configuration file, the application will get every object it will need from the container.

Application confuguration

Let’s look at the configuration file, services.yml. It has two parts. First, the parameters of each constructor is defined:

parameters:
    posttypes:
        - @post
        - @page
        - @person
        - @casestudy
        - @service
    connections:
        - @case_personnel
        - @services_provided
    taxonomies:
        - @casetype
        - @expertise
    queryfilters:
        - @frontpage
        - @cases
        - @persons
    services:
        - @person_api
        - @auto_meta_property

Names starting with @ are references to classes, defined in the later part of the file. The parameters are arrays of classes.

Then, the actual services, which in practise means classes:

services:
    wordpress:
        class:     WPlinth\WordPressFactory
    post_type_manager:
        class:     WPlinth\PostTypeManager
        arguments: ["%posttypes%"]
    queryfiltermanager:
        class:     WPlinth\QueryFilterManager
        arguments: ["%queryfilters%"]
    application:
        class:     ProjectName\Application
        arguments:
            - "@post_type_manager"
            - "%connections%"
            - "%taxonomies%"
            - "@queryfiltermanager"
            - "%services%"
    logging:
        class:     H1\Logging\Logging
    post:
        class:     ProjectName\PostType\Post
    page:
        class:     ProjectName\PostType\Page
    person:
        class:     ProjectName\PostType\Person
        arguments: ["@logging"]
        calls:     [[set_wp, ["@wordpress"]]]
    casestudy:
        class:     ProjectName\PostType\CaseStudy
        calls:     [[set_wp, ["@wordpress"]]]
    service:
        class:     ProjectName\PostType\Service
        calls:     [[set_wp, ["@wordpress"]]]
    case_personnel:
        class:     ProjectName\Connection\CasePersonnel
    services_provided:
        class:     ProjectName\Connection\ServicesProvided
    casetype:
        class:     ProjectName\Taxonomy\CaseType
    person_api:
        class:     ProjectName\Service\PersonAPI
    auto_meta_property:
        class:     WPlinth\AutoMetaProperty
        arguments: ["@post_type_manager"]
    frontpage:
        class:     ProjectName\QueryFilter\FrontPage
    cases:
        class:     ProjectName\QueryFilter\Cases
    persons:
        class:     ProjectName\QueryFilter\Persons

This example file is from a fictitious project. Let me explain it a bit. We have a site that displays reference cases and services that a company has. Personnel and services are connected to reference cases with Posts to Posts. Personnel information is integrated with the company CRM, using PersonAPI class, and we are logging each change to a person post because of that.

Application class

An instance of most classes is passed on to the Application object as a parameter. That class itself can be very simple:

namespace ProjectName;

class Application {
	public function __construct( $posttypemanager, $connections,
		 $taxonomies, $querymanager, $services ) {
	}
}

We could store the constructor parameters as instance variables, if we would like to extend the Application class to do stuff with those. But in normally we don’t have to.

Application folder structure

Our [appname]-application has a specific structure. Here is a typical directory structure:

/Connection
/PostType
/QueryFilter
/Service
/Taxonomy
/Test
Application.php

Each of the folder contains the classes that inherit from a base class in WPlinth. For example PostType folder contains all the post types and they are classes that inherit from WPlinth PostType base class. Service is just a generic folder name for miscellaneous services. You can obviously have different and/or other folders (namespaces) in your application.

In the next post, we’ll look at code inside those classes.

WordPress Software Development at H1. Part 1: The Building Blocks

You have probably heard somebody say that it is impossible to write proper, professional software with WordPress. If not, at least somebody has implied how WordPress is not a professional tool and that real software developers would not use it.

They are all wrong. You can write great code and WordPress is not stopping you.

This series of posts will not explain in detail what are the principles of great code and what are the benefits of writing such code. But if you already know about them, it will teach you how to apply those principles in the WordPress world.

Great code?

So what is this great code? For me, it starts by not being procedural. Most of WordPress itself and its plugins is procedural. That kind of development style quickly leads to messy code, if you write more than just a couple of functions.

You want your code to be clean, easy to understand, testable, with minimum amount of dependencies within components, reusable, extendable… and conforming to all the other principles of great code. You can do all this in procedural code. But these things are way easier if you write object-oriented code.

Tools we use

To do all this fast, you need tools. Here are the tools we use to build applications on WordPress:

(1) Bedrock WordPress Stack is a stack of tools and a project structure. The most significant thing that it comes with is (2) Composer. Composer is a dependency manager, meaning you get to define the third party requirements your application has and Composer will get them for you. You give up automatic updates from within WordPress, but for proper software development and maintenance process you should anyway.

Composer comes with (3) an implementation of PHP autoloading. Autoloading loads files that contain classes right when you need them. There is no need to litter the code with require and include statements. Autoloading requires you to name the folders and files according to a strict standard, which in itself is a good thing. Folders match the namespace names and file names match the class names they contain.

There are some very common types of classes we write. Probably the most common type is a class that represents a custom post type. Custom taxonomies, Posts 2 Posts connections and query filters are other common types. To help with that, we have created (4) WPlinth, a collection of base classes and other functionality. It helps with writing testable code in other ways too: there is a simple mechanism to easily mock WP_Query and other core WordPress classes without using a wrapper.

As part of WPlinth we have adopted and modified (5) Loopable Query to let us interact with WP_Queries with foreach loops and not all that boilerplate code you normally have to deal with. Turns out that makes mocking the monstrous WP_Query a lot easier, since in many cases you can use an array to do the job, and in worst cases you need to cast that array as an object.

We use Symfony framework’s (6) DependencyInjection Component. Dependency injection helps to write code that is not dependent of specific implementation of other functionality. We define our application class configuration as a yml file and could easily switch the implementation of parts of the application without actually touching the code.

For writing the actual tests, we use (7) PHPUnit. To help with WordPress specific testing we use (8) WP_Mock.

Every tool I mentioned above, except of course Bedrock, is available as a Composer package.

In the next post we will delve into actual code and more details of our setup.

Editor Buttons Simplified

WordPress admin interface is great and getting better all the time. One thing though I think has not received any thought in a long time is the selection of buttons on the TinyMCE editor interface.

Update 2015-05-18: The plugin is now available on the official WordPress.org repository with one major modification: there is only one row of buttons and an expand functionality. This works a lot better responsively than two separate rows do.

I have created a simple plugin (on GitHub as well) to be able to easily test the modifications I propose. But I wanted to explain the rationale behind all the changes here.

Here are the WordPress default buttons with the “kitchen sink” open:

That is a lot of buttons.

My initial proposal is this:

Let’s go through the changes now.

Headings are important

If you write a blog post longer than just a couple of paragraphs, you really need headings. The dropdown (called formatselect in TinyMCE) is hidden by default, behind the obscure kitchen sink button. Most users don’t know of its existence, so they end up making a paragraph bold to mark up a heading, which is not good for SEO and certainly is not properly marked up reusable content. Those, that do find the control, are forced to see two rows of mostly useless buttons all the time.

My solution is to put the dropdown as the first item on the default button row.

Heading levels

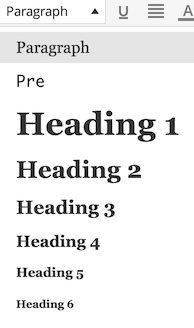
Here are the current dropdown values:

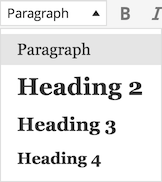
I do not think one should use h1 inside a post. That should be reserved for the post title only. Also, having all the six heading levels is too much. Three levels are enough for most uses. If you need more, you probably should divide the post into two or more separate articles to make it more readable.

Pre is useful if you paste code, but that is not for most people. Removed.

Here’s the simplified dropdown:

Alignment buttons

Alignment buttons can be used for two things. You can align text and you can align images. Alignment of text does not make much sense. Unless you write poetry maybe. Most users do not.

Alignment of images can be done by clicking an image in question and then clicking the proper alignment button from the popup menu.

Strikethrough and horizontal line

To simplify the default row a bit more, we could move the strikethrough and horizontal line buttons to the second row. Those buttons can be useful, but not most of the time.

Secondary row modifications

I would like to remove the underline button, since one should not write underlined text on the web in general. An underline denotes a link.

One should not use full justified text on the web, unless it can be automatically hyphenated. Until browsers do that, I would remove the button.

Text color choices should not be done by the author. Instead, a style selection tool could be used (that can be activated through the TinyMCE API, if needed for the content and the design of the site).

Indent and outdent buttons do not make sense to me. What is their use case? Remove them, I say.

Here is the end result for the secondary row:

It’s actually so small number of buttons that it almost makes sense to put all the buttons to the same row.

Conclusion

It is easy to revamp the editor toolbar to be move usable, simple and useful.

It will require a way more thorough analysis to make the changes on the product level, but at least for our clients a setup similar to what I have described above makes a lot more sense than the current default.